
 UA
UAOutdoor composting
Installation of the composter
Choosing a location for the composter
The choice of location is extremely important when installing a composter. It is best to put it on the lawn on fresh, loose soil (you can even dig it a little). This is needed to ensure that the liquid from the compost will be absorbed directly into the ground. For the same reason, it is important to place the composter on a flat surface – so that there are no gaps between the composter and the ground surface and the compost liquid does not leak. This will help you avoid the odor. And to avoid problems with rodents and stray animals (dogs and cats), we recommend securing the container with a metal grid inside. See the step-by-step instructions for installing the grid below.
Installation of the composter grid
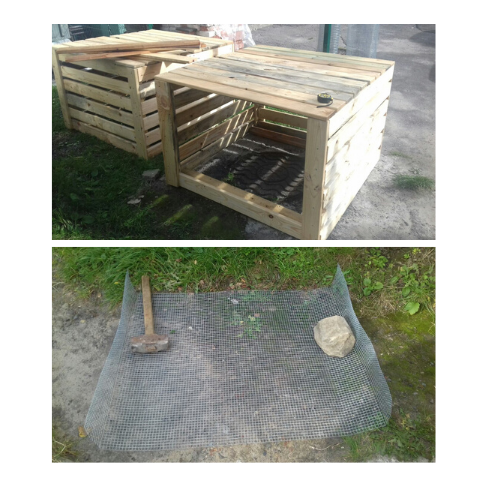
To build in the grid, remove a few boards from one side of the composter.
Take a grid 1.5 m long and 1.4 mm thick. Bend it back on both sides approximately 17 cm. It is necessary that the grid lyes on the bottom of the composter.

Bend the grid to the bottom of the compost.
Fasten the grid with screws.

Also fasten the grid with screws on the sides.

The grid – 3.5 m long and 0.8 mm thick – you need to bent on one side by about 30 cm.
Make two cuts in the corners on the smaller bent side, so that the grid can overlap.

Lay the grid on the sides of the composter over the one that is installed at the bottom of the composter.
Attach the grid to the sides with screws, as well as the bottom in several places.

Fix the grid with screws on the top and middle (4 pieces).
Reinstall the boards that were pulled out prior to the installation
The composting process
After you have selected a location, installed the composter and the grid, we begin to compost.
How to fill in organic waste
The best way to start composting is to lay the bottom of the composter with a layer of garden waste (approximately 20-30 cm). First of all, this layer will absorb excess moisture from the first composting layer. The best ratio is 1 part of garden waste to 3 parts of kitchen waste. Usually, in a public composter (or in a private compost near a private home), everyone sprinkles organic waste with leaves, but if the condominium facility has such an opportunity, it is better to have one person in charge of the composter. The frequency may be different (once a day, every few days). For example, every morning after cleaning, if the janitor looks after the composter. It all depends on how many apartments are involved and how much kitchen organic waste is taken to the composter. This will be a good safeguard for the compost to become too moist, therefore, there will be no unpleasant smell and drosophila.
Watch this great video from the Soil Life in Action project that demonstrates the work of worms in a composter.
It is perfect if there is a separate bin for garden waste near the composting site where the composting process takes place. Branches, leaves, dry grass from the area around, so the garden waste you can take to pour it over the kitchen waste in the main composter.
We also recommend you to cover the wooden composter with a banner to secure it of rain and snow so that moisture does not get inside. You can always get used banners from our friends Green Box.
You can add organic waste (both kitchen and garden) through the top of the composter. The bottom door is only used to take out the ready compost.
How to integrate worms into the composter
Worms should be replanted with the substrate with which you purchased them. And for worms to get well, they need a lot of this substrate, so when buying, ask the seller to fill a lot of it in the box with the worms. To settle the worms, it is necessary to make a shallow hole closer to the back wall of the composter, but not under the wall itself, and put them there with the substrate.
The composter in winter
In winter, the worms will hide from the cold and crawl inside the composter. There is enough space in the 900-1000 liters outdoor composters. It is very important that by the beginning of the frosts, the compost should have already been filled at least by half and the worms would have been settled and taken root. Worms will feed on what is already in the composters. Also, when composting, heat is released, so a positive temperature will remain inside the composter, even if the organic matter closer to the edges will be frozen. The frozen compost will decompose very quickly after it will be melted.
The most common mistakes in compost formation, their causes and methods how to tackle them
|
Problem |
Reason |
Method |
|
Too dry: – composting stops – gray fungus |
Due to warm or dry weather, much water is evaporated, or too many dry leaves or grass were added, so the activity of the microorganisms ceased. |
Stir the contents of the composter and moisten, or add kitchen waste. |
|
Too wet: – odor of decay – it is brown-black colored – lack of oxygen – flies appeared |
Long rains or too much “wet” waste (grass wedge, kitchen waste), or too little dry garden waste (branches, bark, dry leaves). |
Add dry garden waste (branches, straw, dry leaves). Mix the contents of the composter, it will add oxygen. |
|
Slow composting: – usually dry – bugs appear |
Too high part of dry garden waste in the compost. |
Add more kitchen waste. Large pieces of wood should be crushed. |
|
Bad smell: – lack of oxygen – too moist, sticky |
Too much of the wet kitchen waste. |
Loosen the compost, mix it and act as you would with too moist compost. |
|
The emergence of rodents |
1. The presence of rodents in the neighborhood. 2. A large number of animal remains (meat, fish, bones) were thrown into the compost. |
1. Properly derivatize. 2. Restrict the ability of rodents to enter the compost. Make sure there are no damages or holes. Animal leftovers can attract rodents, so keep count to not get many of them at once into the composter. |
|
The appearance of fungus |
Excess of fresh kitchen waste containing sugar and glucose (such as spoiled fruits), especially on the compost surface. |
Fresh kitchen waste should be mixed thoroughly (aeration required). Add leaves and grass. |
What to do with ready compost
Ready compost is a valuable fertilizer for both houseplants and flower beds, shrubs, and trees in the territory of the condominium.
Ready compost can be mixed with soil when planting or transplanting home pots.
It can also be mixed into the ground when planting trees, shrubs, and flowers around the house, as well as it can be mixed into existing flower beds.